
Most of us don’t think deeply about our washing machine until it starts acting up. One day it’s quietly spinning through laundry loads, and the next it’s clanging, thumping, or worse, refusing to work at all. I learned this the hard way when my son Thaddeus managed to wash half a rugby pitch’s worth of mud along with his uniform, and suddenly, our machine went on strike. I opened it to check the damage and realized that when something big breaks inside, your wallet better brace itself.
The Hidden Giant: Why the Washing Machine Drum Costs the Most
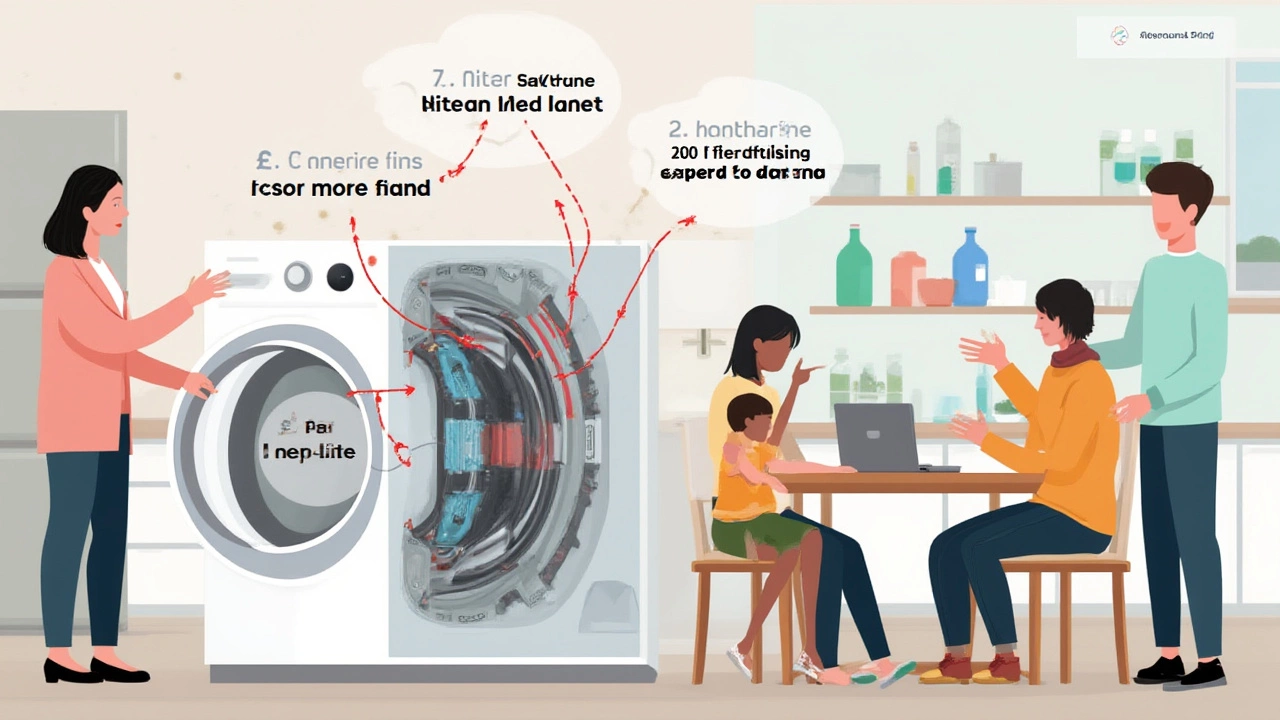
So, what’s really the most expensive part to replace on a washing machine? Hands down, it’s the drum. Not the flashy buttons, not the pump, and not the sensors. The drum is the mammoth chunk of metal (or, in some models, high-grade plastic) that actually holds and spins your clothes. It’s the heart and core of the machine, and when it fails—whether from a cracked spider arm, corroded bearings, or catastrophic physical damage—you’ve got serious costs ahead.
The drum itself is pricey, but it’s the labor that gets you. Replacing a drum means the technician has to pretty much tear the whole machine apart and put it back together again. Unless you’re a seasoned DIYer and have the hours (plus, let’s be honest, the patience), you’re looking at a hefty repair bill. In New Zealand, as of 2025, the average cost to replace a drum in a front-loader sits between NZ$600 and NZ$1,100. That’s just for the part and labor, not counting extra problems like seized bearings or broken seals.
Most manufacturers design washing machines so the drum isn’t supposed to break, at least not for the first 10 years or so. But hard water, overloading, or a rogue coin can speed up its demise. My mate up the street learned this when his daughter left a marble in her pocket—one load later, the drum looked like a steel cheese grater. And here’s where it gets controversial: some brands now make drums sealed inside the outer tub, so you can’t even swap one without replacing both, doubling the cost.
Now, if the bearings go (the things that help the drum spin smoothly), the issue escalates. The bearings themselves aren’t that expensive, but getting to them requires stripping down the whole machine—almost as much effort as a full drum replacement. Many repair techs just tell you to replace the whole drum assembly with the bearings pressed in. See how the costs snowball?
Let me toss in a table here. These are current average replacement costs for major washing machine parts in New Zealand (2025):
| Part | Average Cost (NZD) |
|---|---|
| Drum | 600 – 1,100 |
| Motor | 350 – 600 |
| Control Board | 250 – 450 |
| Pump | 120 – 250 |
| Door Seal | 100 – 220 |
This makes it pretty clear—the drum is in a league of its own for cost. If your machine’s drum has a major fault, most people start weighing the repair against just buying a new machine.

Not Far Behind: Control Boards and Motors
After the drum, the next most painful expense is the control board—the brain of the washing machine. This is the fancy green circuit board inside that communicates with every part, from the sensors to the spin cycle. It manages water flow, motor speed, and those little comfort features like child locks and delayed start (which my son Thaddeus turns into a game).
When something goes haywire here, it’s usually sudden and dramatic. Maybe your machine flashes weird error codes, or just goes dead. Faulty control boards can be caused by power surges, accidental water leaks inside the console, or sometimes, just a dodgy batch of components from the factory. I had a neighbor whose toddler decided the control panel looked like a great spot to pour orange juice. That’s a $400 mistake right there.
The tricky bit? Sometimes a failing control board can mimic the symptoms of a bad pressure sensor or faulty door lock. So you pay for diagnosis first (usually $100 and up) just to figure out what’s wrong. Then you shell out for the board, which often costs more than the pump, motor brushes, or heater. DIY types can swap out a board themselves, but you’ve got to be careful with all those fragile connectors and sensitive chips.
Motors are up there in the big expense league too. These are usually robust and last well, but if they die due to electrical faults or overheated bearings, the replacement cost is rarely friendly. Brushless motors are common now, which do last longer, but when they eventually fail you can spend $500 or more just for the part on modern machines.
One thing I learned: never ignore burning smells or weird vibrations, no matter how well your playlist is blasting during laundry day. Early warning signs usually mean the motor’s brushes are wearing down, or the bearings are toast. Catch these things early and you might just save yourself from a wallet-busting bill.
Tips for Avoiding Expensive Washing Machine Repairs
Let me be honest: nobody likes spending hundreds of bucks fixing a washing machine. There are a few things you can do right now to stretch the life of those expensive parts. Here are some hard-earned tips (learned from years in a busy family home, not just from reading manuals):
- Don’t overload the machine. Every kilo above the recommended limit puts real stress on the drum and bearings. If you can’t easily wiggle your hand between the clothes and the top, it’s probably too full.
- Check for objects in pockets. Coins, keys, marbles (shout out to every parent), and hair clips all become projectiles inside the drum. It sounds basic, but it’s the top reason for drum damage in my house.
- Clean the filter. Lint, pet hair (looking at you, Gizmo), and even the odd sock can block the pump and cause back pressure on delicate components. Do it monthly if you run lots of loads.
- Use the right detergent. Too much suds can cause overflow, which sometimes leaks onto the control board. Powder or liquid doesn’t matter—just don’t go nuts with it.
- Level your machine. Uneven floors make the drum and bearings work overtime. Use those adjustable feet, and a good old-fashioned bubble level.
If the worst does happen and your machine starts rattling like a jet engine, here’s a rough step-by-step on what you can do before calling a repair tech:
- Unplug the machine (seriously, don’t skip this).
- Check for visible blockages in the pump filter—some models have a small door up front.
- Look for leaks, cracks, or loose wires if you feel brave and can safely remove the back panel.
- Make a note of any error codes. Most brands have online resources that let you look up the meaning.
- Decide if the repair cost (see that table above) makes sense versus investing in a new machine. If your model is old, it might be time to upgrade. Some Kiwi appliance stores offer trade-ins, so you’re not left with a useless chunk of metal.
One last thing most people don’t realize: sometimes parts are covered under warranty even a few years out, especially if you can show you did the regular maintenance. Keep those receipts, make records of servicing, and don’t be afraid to ask the shop or the manufacturer for a goodwill gesture if something pricey fails early—especially for high-end brands.
I know it’s easy to blame the universe when your washing machine gives up. But knowing the true ‘cost monsters’ hiding inside and spending five minutes on prevention can make a real difference. Hey, if all else fails and you’re staring down a $1,000 drum replacement, there’s always the trusty laundromat. Just watch out for those people who leave socks in every machine. I’m convinced they clone in there.
I am an expert in the services industry with a focus on appliance repair. My passion lies in understanding how things work and educating others in simple, engaging ways. This enthusiasm fuels my writing, where I delve into topics around appliance maintenance and troubleshooting. I aim to make these subjects clear and accessible to all readers.