Struggling with a water heater that's only giving cold water? First things first, let's not panic. This is a common problem and usually has a straightforward solution. Before calling in the pros, there are some simple checks and fixes you can try yourself. Imagine the satisfaction of solving it on your own!
Start by considering a couple of key areas: the power supply and the thermostat setting. Make sure your water heater is getting electricity. If it's a gas heater, ensure the pilot light is on. Electric heater? Double-check the circuit breaker. It might've tripped without you noticing.
- Diagnosing the Cold Water Problem
- Power Supply and Electrical Checks
- Thermostat Adjustments
- Replacing the Heating Element
Diagnosing the Cold Water Problem
Alright, let's tackle this water heater issue head-on. When your water heater is acting up and not giving you the hot water you need, the first step is to figure out where things went wrong. A misbehaving water heater doesn't just happen without a reason, so we’re going to track it down.
Start by asking yourself: is the water heater getting enough power? For electric heaters, the circuit breaker could have tripped. Head to the breaker box and look for any switches that aren't in line with the rest. Give them a nudge back to 'on' if needed.
If you have a gas heater, the issue might be with the pilot light. If it's out, you'll need to relight it. Be sure to follow the instructions on the unit or look up a quick guide to safely relight it. A pilot light going out occasionally is not uncommon, but if it happens often, it could signal a bigger problem.
Next, consider the thermostat settings. The thermostat might have been accidentally adjusted, or it might be faulty. Make sure it's set to a temperature between 120-140 degrees Fahrenheit. This range ensures hot water without scalding and is energy efficient, too.
To figure out if it’s a thermostat issue, turn it up slightly and listen for a click sound. No click? The thermostat may need replacing.
| Part | Possible Issue | Initial Fix |
|---|---|---|
| Power Supply | Circuit breaker tripped | Reset the breaker |
| Pilot Light | Light went out | Relight the pilot |
| Thermostat | Improper setting | Adjust temperature |
Taking a systematic approach to solving the cold water issue helps narrow down the cause. Once you know where the problem lies, fixing it becomes a whole lot simpler. Remember, a solution is often just a switch or adjustment away!
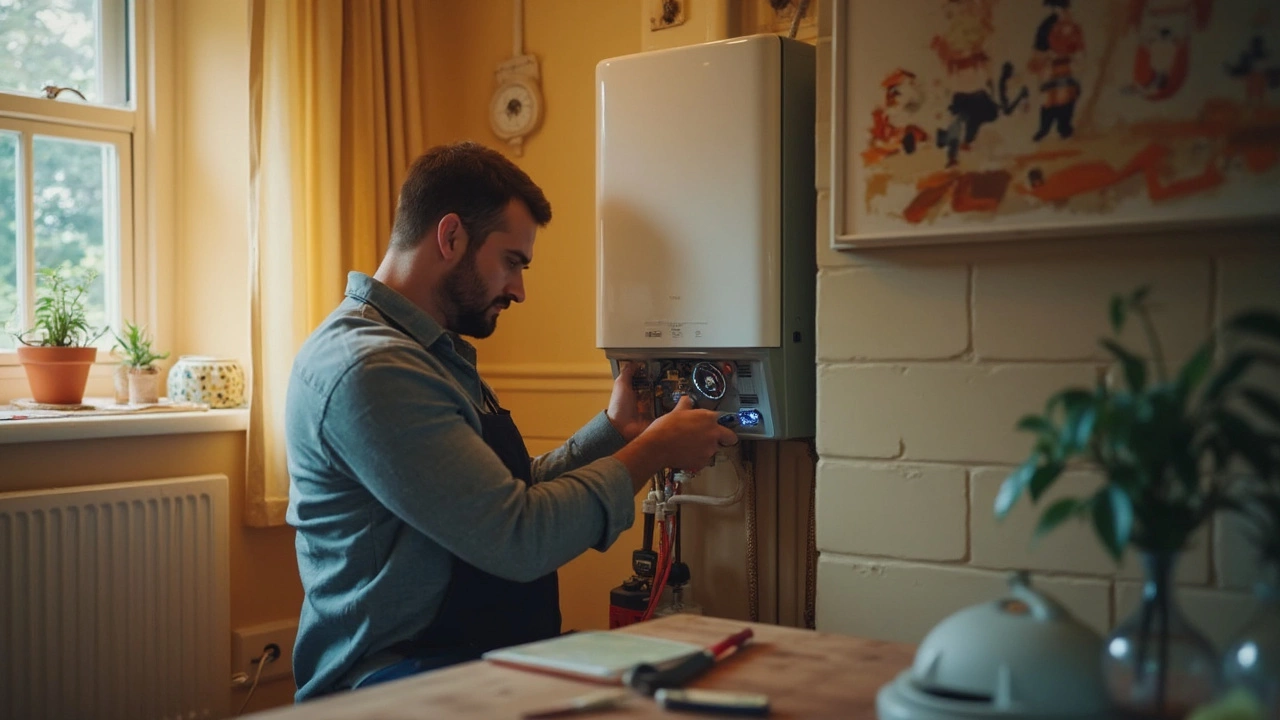
Power Supply and Electrical Checks
So, your water heater's giving you the cold shoulder? One likely culprit is the power supply. Whether it's electric or gas, the juice has to be flowing for your water heater to pump out hot water.
If you’ve got an electric water heater, check the circuit breaker. You’d be surprised how often a simple flip of the switch gets things back on track. Sometimes power surges or just mundane wear and tear can cause breakers to trip. Head over to your electrical panel and see if the breaker for the water heater is in the "off" position. Flip it back to "on" and see if that changes things.
Don’t miss out on checking the power plug too. It might have gotten disconnected, and that's a quick fix. Just make sure it's securely plugged in.
For gas heaters, ensure the pilot light is burning bright. No flame means no hot water. While you're at it, check the gas line. Sometimes, closing the gas valve during home repairs could leave it inadvertently off.
Another thing to consider, when making sure the power supply’s not your problem, is the wiring. Maybe a sneaky little rodent had its share of electric spaghetti in your attic. If wires seem suspect, it might be best to call someone professional to avoid any risk.
Here's a quick tip: set a regular schedule to check your water heater's power supply, maybe every couple of months. Catching these little issues early can save you a lot of cold showers!

Thermostat Adjustments
So, your water heater is set up, but it's still giving you cold water? It might be time to take a closer look at the thermostat. It's the gizmo responsible for controlling the water temperature, and if it's off even by a little, your hot shower dreams could be dashed.
First, locate the thermostat on your water heater. On most models, especially electric ones, you'll find it behind a panel that you'll need to unscrew. Safety first—make sure the power is off before you do this, no one wants an accidental jolt of electricity while tinkering.
Once you've removed the panel, find the temperature dial. Check the current setting. A common recommendation is to set it around 120 degrees Fahrenheit. Not only does this help avoid scalding, but it also saves on energy. According to the Department of Energy, "Lowering your water heater’s temperature to this level can save you up to 5% in energy costs."
"Consistently adjusting your thermostat to the optimal range can significantly extend the lifespan of your water heater and enhance performance." - John Bardwell, Expert Plumber
If you need to adjust the temperature, turn the dial accordingly. After doing so, replace the panel and restore the power. Give the heater some time to work its magic and then check if the water reaches the desired temperature.
Here's a quick recap in case you need it:
- Turn off the power to the water heater.
- Remove the panel to access the thermostat.
- Adjust the temperature to around 120°F.
- Replace the panel and turn the power back on.
- Wait a while and test the water temperature.
In the process of adjusting the thermostat, if you find it damaged or unresponsive, it might be time to swap it out. Replacement thermostats are affordable and can be found in most hardware stores. Keeping the water heater operating within ideal conditions will not only bring back hot water but also makes the unit last longer.
Replacing the Heating Element
So, you've checked everything else, and your water heater is still being stingy with the hot water. It's time to look at the heating element. This little gadget is responsible for actually warming the water, and sometimes it just gives up the ghost.
First things first, you need to figure out what kind of heating element you have. Usually, water heaters have one or two elements depending on the model. These can be found behind access panels on the side of the unit. Before you dive in, shut off power to the unit for safety. Seriously, you're dealing with electricity and water here—never a good combo!
- Power Off: Turn off the circuit breaker to the water heater. If it's a gas heater, turn off the gas valve.
- Drain the Tank: Attach a hose to the drain valve at the bottom of the tank and let the water flow out. This prevents any soggy surprises.
- Access the Element: Remove the access panel and the insulation underneath to reveal the element. There might be a plastic cover over the thermostat and the element terminals—take that off too.
- Disconnect the Element: Use a multimeter to ensure there's no power. Then, unscrew the wires attached to the heating element.
- Remove the Old Element: You might need a special socket wrench called an element wrench for this. Turn it counterclockwise to loosen and then remove the element.
- Install the New Element: Grab your new heating element and insert it where the old one was. Tighten it securely with your wrench.
- Reconnect Everything: Attach the wires to the new element terminals. Replace the plastic cover and then the insulation. Finally, close the access panel.
- Refill the Tank: Close the drain valve and remove the hose. Open the water supply to refill the tank.
- Power On: Turn the power back on and let the tank heat up. It might take a bit for hot water to cycle through, but you should be good to go!
Remember those keyword symptoms: if your heater is still producing cold water after replacing the element, there might be another issue, like a faulty thermostat or even deeper electrical hiccups. But normally, your DIY water heater repair should have you feeling toasty again.
I am an expert in the services industry with a focus on appliance repair. My passion lies in understanding how things work and educating others in simple, engaging ways. This enthusiasm fuels my writing, where I delve into topics around appliance maintenance and troubleshooting. I aim to make these subjects clear and accessible to all readers.