
Replacing a kitchen extractor fan can feel like a challenge at first, but it's definitely something many can do with some guidance and patience. These fans are crucial for maintaining cleanliness and air quality in the kitchen, whisking away smoke, steam, and odors to leave your cooking space fresh and pleasant.
Before diving into the process, it's helpful to understand the basic components and workings of your extractor fan. Knowing what tools you'll need and the safety precautions to follow can set you on the right track.
This guide seeks to demystify the process, walking you through each step from removing the old fan to installing the new one. Along the way, you'll encounter helpful tips and common troubleshooting advice to ease the journey. With the included maintenance tips, you'll ensure your new fan runs efficiently for years to come.
- Understanding Your Extractor Fan
- Tools You Will Need
- Safety Precautions
- Step-by-Step Replacement Process
- Troubleshooting Tips
- Maintenance for Longevity
Understanding Your Extractor Fan
The kitchen extractor fan is more than just a noise maker over your stove. It's an appliance designed to improve the air quality in your kitchen, keeping it free from unwanted odors, smoke, grease, and steam. In essence, it provides essential ventilation, which is crucial for maintaining a comfortable and clean cooking environment. Most modern homes have them installed right above the cooking hobs, capturing emissions at the source. These fans can differ significantly in terms of design, efficiency, and method of operation, hence understanding your specific model is key to its successful replacement.
Extractor fans are generally categorized into two main types: ducted and recirculating. Ducted fans, often regarded as the most effective, expel air from your kitchen entirely by directing it outside through ductwork. Although highly efficient in removing steam and fumes, planning is critical for these types since they require the installation or utilization of existing duct paths. On the other hand, recirculating fans filter air through carbon filters and release it back into the kitchen. While these may not be as efficient in removing heat, their installation is simpler since they don't require exterior ventilation. It's worth knowing the particular benefits and limitations of the type you have or plan to install.
"The average American kitchen air quality can decline by over 10% following a single cooked meal," notes kitchen technology expert Harriet Blanton.
When considering which extractor fan to purchase, it's important to consider a few key specifications. The fan's extraction rate or power, usually measured in cubic meters per hour (m³/h), indicates how much air it can process. For effective ventilation, it should replenish the air in your kitchen at least 10 times an hour. Additionally, consider the noise levels. Units can range from a gentle hum to an intrusive roar, measured in decibels (dB). Many opt for powerful yet silent models, but these often come with a heftier price tag. Energy efficiency is another critical factor, as more energy-efficient models may save you money in the long run. An A-rated extractor fan can significantly reduce energy consumption compared to less efficient models.
| Type | Efficiency | Installation Ease |
|---|---|---|
| Ducted | High | Moderate to Complex |
| Recirculating | Moderate | Easy to Moderate |
To find an extractor fan that suits your kitchen perfectly, you need to think about its size, style, and fit with your current setup or new kitchen design. Larger kitchens naturally require models with higher extraction rates. Many of today's fans come loaded with extra features such as LED lighting, touch controls, and even Bluetooth connectivity, which can make cooking more convenient and enjoyable. When choosing a fan for your kitchen, aim to balance functionality with aesthetics. After all, it's not just a tool, it's part of your kitchen's appeal.
Tools You Will Need
When embarking on your journey to replace a kitchen extractor fan, having the right tools at your disposal can make the process noticeably smoother and much more enjoyable. Unlike many household repairs, this task requires a blend of both common and specialized tools. It's not just about having a toolbox; it's about understanding what each tool is meant for and why it's necessary. First, a screwdriver set is indispensable. Since extractor fans have various sizes of screws, both Philips and flat-head screwdrivers are essential to handle different types. Ensure the handles are comfortable to hold, as you might need to exert some effort to remove stubborn screws.
Next, a voltage tester is a critical piece of equipment when dealing with anything electrical. Safety should always be your top priority, and knowing that there’s no current running through the wires will give you peace of mind. A deeper dive into the tool kit reveals wire strippers and a utility knife. These tools come into play if you need to make adjustments to the fan's wiring or if the unit is hardwired. Electrical tape is also a valuable addition, perfect for securing wire connections once everything is set in place. While a power drill isn't always necessary, it can be incredibly handy if you encounter a tightly fitted fan or if you need to drill new holes for the mounting brackets.
The inclusion of a spirit level should not be underestimated. Ensuring the fan is precisely aligned not only helps with optimal performance but also enhances the overall aesthetic of your kitchen. No crooked fans allowed! Lastly, don't forget about a dust mask and safety goggles to protect yourself during the process. Cooking residue can build up in and around the fan, and you wouldn't want that gunk bothering you. A headlamp or a standalone lamp is also practical to illuminate those dim corners of your kitchen, providing a clear view of what you're doing.
"Preparation saves time, minimizes frustration, and ensures better results," says DIY expert Bob Vila.
Here is a summary table showcasing some of the essential tools and their importance:
| Tool | Purpose |
|---|---|
| Screwdriver Set | Removing and installing screws. |
| Voltage Tester | Checking electrical safety. |
| Wire Strippers | Adjusting fan wiring. |
| Utility Knife | Cutting tasks as needed. |
| Spirit Level | Ensuring the fan is level. |
Having these tools prepared and ready will not only fast-track your installation process but also instill confidence. Approach the task with a mindset geared towards learning and satisfaction as you see your kitchen transformed by your own hands. Once organized and equipped, you're not just ready to replace a fan; you're stepping into the realm of kitchen mastery with a sense of accomplishment in view.

Safety Precautions
Embarking on a DIY adventure to replace your kitchen extractor fan is thrilling, but before diving in, taking the right safety precautions is a must. Safety isn't just an afterthought—it's the backbone of any successful home project. This section will highlight important steps to prevent accidents and ensure everything goes smoothly as you venture into the world of extractor fan replacement.
First, it’s crucial to shut off the power supply to the kitchen to avoid any electrical mishaps. Find your main power box and switch off the circuit that connects to your kitchen. This simple action isn't just a box to tick; it’s a lifesaver. Remember, electricity is invisible but potent, and staying safe means cutting off its flow before starting your work. Without this precaution, a sudden charge could course through the wiring, leading to injury.
Next, ensure you’re working with the right tools which are in good condition. Worn wiring and connectors in a hailstorm of bits and parts might seem intimidating, but remember that this complexity is rooted in logic. A poor-quality screwdriver can slip and mar surfaces or, worse, injure you. Have a well-lit workspace and use tools like screwdrivers and wire strippers that fit comfortably in your hand and are in good shape. Not only does this make the process smoother, but it minimizes the risk of slips and mishaps.Repair work demands precision, not speed, so take your time to use the appropriate equipment properly.
Considering protective gear is another layer of keeping yourself safe. Goggles safeguard your eyes from dust and debris that might fall during the dismantling process. Dust might seem harmless, but even tiny particles are keen on stirring trouble by causing irritation. Gloves are another tool in your kit—they offer grip and keep your hands free from nicks and cuts. Furthermore, since gloves can also protect you from grime and some electrical hazards, they should not be overlooked.
"Safety isn't expensive; it's priceless." - Author Unknown
Lastly, it’s wise to review the extractor fan’s manual or any documentation available. These guides typically offer unique insights into specific elements that might affect the removal and installation processes. Every fan model is unique in its own way, and even identical-looking fans might offer surprises due to hidden screws or unconventional mountings. Manuals often contain diagrams that provide clarity and detailed information on disconnecting the unit from electricity and gas if that applies. These steps are not tedious formalities but essential guiding stars.
Whether for an expert chasing efficiency or a newbie aiming not to bungle things up, the manual is a treasure trove. And remember, there’s no room for skimming pages; a detailed read can uncover safety warnings specific to your device model.
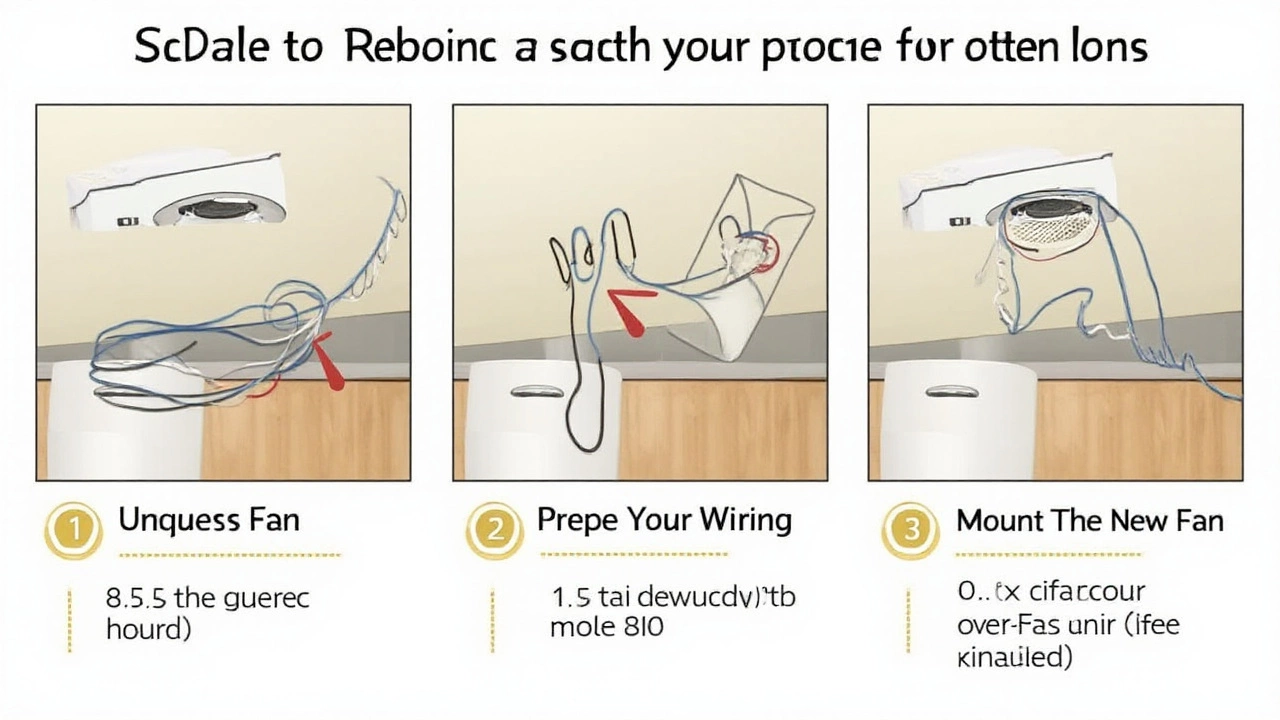
Step-by-Step Replacement Process
Replacing a kitchen extractor fan yourself is a gratifying project that not only saves money but also gives you a sense of accomplishment. Start by ensuring safety first. Before you begin, make sure the power is turned off at the main breaker. This is crucial to avoid any electrical accidents. With your tools ready, including a screwdriver, voltage tester, drill, and possibly a caulking gun, you're prepared to dive in. Understanding each step beforehand can ease your nerves and possible frustration down the line.
The first step is to remove the existing fan. Typically, this process starts by detaching the cover or filter. Use a screwdriver to unscrew any visible screws, taking care to place them somewhere safe for future use. Once the cover is off, use a voltage tester to ensure there's no electrical current, demonstrating the importance of double-checking your safety measures. After confirming power is off, proceed to unscrew the fan unit from its mounting bracket. It's always helpful to have a second set of hands when handling larger units to prevent accidents. As this is occurring, consider the location where the new fan will be installed, assessing whether additional modifications to fit the unit are necessary.
Next, focus on preparing the spot for your new extractor fan. Check that the size matches, or you may need to make alterations to accommodate the new fan. Dry-fitting the new unit before final installation can save time. Be ready to cut an appropriate shape in the ventilation conduit if differences arise. With everything in place, it’s time to handle the wiring. Wire connections might seem intimidating, but a straightforward approach makes it manageable. Typically, the new fan wires will match the old fan's— ensure that wires are connected correctly, usually color to color: black to black, white to white, and the green or bare wire is the ground. Remember to use wire nuts to cap off the connections securely.
As you mount the new unit, make sure it's aligned correctly. Misalignment can lead to improper functionality, often resulting in noises or reduced efficiency. Secure the fan by screwing it tightly onto the mounting bracket. Once everything is in position, reattach the fan cover or filter. This stage often involves re-checking any part you unscrewed earlier. After this, a crucial step is sealing the edges around the fan. A caulk gun is useful to apply a sealant— a vital measure to prevent any unwanted air leaks that could compromise your kitchen's ventilation.
"Safety and performance are the pinnacle of any home DIY task," notes home improvement expert Lisa McCarthy, "always prioritize a safe installation to ensure long-term reliability of your kitchen appliances."
Finally, it's time to perform a test run. Flip the power back on at the breaker, then switch on the fan. Listen and observe. The fan should operate smoothly without excessive noise or vibration. Any unusual sounds could signal the need for adjustments. This final part is satisfying, signaling the completion of this entire process and ensuring your kitchen is ready to tackle any culinary adventure with a fresh and clean air environment.
The entire process from start to finish can be completed within a couple of hours for someone familiar with basic DIY tasks. But don't rush; patience is key to ensuring everything is done correctly. Several online tutorials and manuals are available specific to each model, which can be beneficial resources. Taking your time to understand your specific model's needs will ensure the longevity and efficiency of your kitchen extractor fan. Enjoy the improved air quality and satisfaction of enhancing your home with your own hands!
Troubleshooting Tips
Embarking on a DIY kitchen extractor fan replacement journey can sometimes throw a wrench in the works, literally and figuratively. Despite diligent preparation, hiccups occur, making troubleshooting an important skill to cultivate. For starters, after completing the installation, if your new fan doesn't power up, double-check the electrical connections. A common issue is the wiring coming loose during installation, which can disrupt the power supply. Make sure all wires are securely connected and that the breaker hasn't tripped. Another potential problem could be with the compatibility of the fan with your kitchen's existing ductwork. Ensure that the connections are tightly sealed, as air leaks can significantly reduce the efficiency of your fan, leaving your kitchen with persistent cooking odours and excess moisture.
Noise is another frequent complaint when replacing extractor fans. If your fan is noisier than expected, it might be due to improper installation or a lack of balancing in the fan blades. Access the setup to ensure the fan is securely mounted and well-aligned. Often, a little tightening of screws and adjustments to the mounting can cut down the noise drastically. Potentially, the fan could be clogged with debris, especially if reusing old ducting, which adds to the stress on the motor and causes excessive noise. This is where good maintenance and thorough cleanup before installing come into play. Keeping the ducts and fan blades clean can help prevent noise issues and extend the life of your extractor fan.
Sometimes, issues with suction arise—your fan isn't pulling out the air as efficiently as it should. Examine the fan’s vents and make sure they're not blocked by grease or other kitchen particulates. In some cases, the issue may not lie with the fan itself but rather with the duct passages. A duct passage that's too long, overly complex, or has too many bends can severely impact the extractor fan’s performance, causing weak airflow. Simplifying the duct route or enlarging the vent size can alleviate this issue. Regular maintenance checks can identify these problems before they escalate. As the famous mechanic and writer Fred Rogers noted,
"There is no such thing as a problem without a gift for you in its hands. You seek problems because you need their gifts."Taking a proactive approach to maintain your extractor fan not only resolves immediate problems but also gifts your kitchen a long-lasting, efficient ventilation solution.
Here’s a quick look at maintaining fan efficiency and potential problem indicators:
| Problem | Possible Cause | Solution |
|---|---|---|
| No Power | Loose Wiring or Tripped Breaker | Check connections and reset breaker |
| Excessive Noise | Poor Installation or Debris | Secure mount, clean blades and ducts |
| Weak Suction | Blocked Vents or Poor Ducting | Clean vents, reconfigure ducts |
The key to repairing and maintaining your kitchen extractor fan effectively lies in understanding these potential issues and dealing with them promptly. With these tips, you can ensure your DIY project doesn’t just stop at installation, but sees you through to long-term satisfaction.
Maintenance for Longevity
Ensuring that your kitchen extractor fan stays in optimal condition is as important as installing it correctly. Regular maintenance not only enhances the lifespan of the fan but also ensures it functions efficiently. One of the key aspects of maintaining an extractor fan is consistent cleaning. It's vital to clean the fan filters frequently — typically every two to three months, depending on usage frequency. Grease and grime accumulation can hinder the fan's efficiency, leading to a robust build-up that may eventually affect your kitchen's air quality. Modern fans often include indicator lights, alerting when it's time to change or clean the filters, making maintenance simpler for busy homeowners. Besides this, the outside of the fan should be wiped down with a mild detergent to remove any surface grease regularly.
Inspection is another essential factor in extractor fan maintenance. Regularly inspect the fan's ducting for obstructive materials that may disrupt airflow. While most issues can be resolved independently, some scenarios might require professional intervention. Observing odd noises or vibrations? That could signal an imbalance or a loose component within the fan mechanism. In such cases, calling in a professional could prevent further damages, saving on potential costly repairs down the road. Experts often suggest that fans need professional servicing every two years. Just like a car's engine, your fan requires a check-up to keep all components running smoothly.
One pro-tip is to avoid using the fan continuously at its highest setting. This practice can lead to excessive wear and tear. Instead, moderate use helps to extend its operational life. Replacing old or worn-out parts, such as belts or motors, as they age is another part of good strategy. Purchasing recognized brands can also improve air circulation efficiency while making replacement parts easier to find. As always, consulting the manufacturer's manual can provide specific maintenance instructions tailored to your model, ensuring you're not only doing the right things but doing them right.
"Regular maintenance isn’t just about longevity. It's about ensuring optimal performance and safety in your home," suggests Jane Clark, a certified HVAC specialist.
A well-maintained fan can also contribute to environmental health by reducing your overall household energy consumption, a gesture that’s both eco-friendly and cost-effective in the long term. In fact, a study conducted by the Home Ventilation Institute found that efficiently maintained systems can reduce energy costs by up to 30%. Sharing the responsibility with every family member could transform extractor cleaning into a family event, combining fun with benefit.
By investing in the regular upkeep of your kitchen extractor fan through cleaning, inspecting, and moderating its usage, you preserve its functionality while extending its service life. It’s indeed the small steps that accumulate to provide you with a kitchen environment that's not only comfortable but also healthier and energy-efficient.
- Regular filter cleaning (every 2-3 months)
- Inspect ducting for obstructions annually
- Moderate fan settings for extended use
- Schedule professional servicing every two years
- Use recognized brands for ease of maintenance
- Follow the manufacturer's maintenance guides
I am an expert in the services industry with a focus on appliance repair. My passion lies in understanding how things work and educating others in simple, engaging ways. This enthusiasm fuels my writing, where I delve into topics around appliance maintenance and troubleshooting. I aim to make these subjects clear and accessible to all readers.